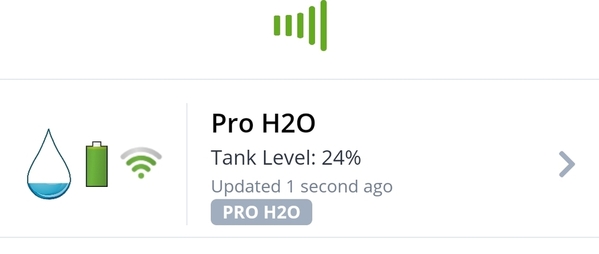
How do you know how much fresh water is actually remaining in the last 1/3 indicated by the last level indicating light? 'Not much' is as close a guess as you can get!

Our level lights on the fresh tank stopped working just after the warranty expired and since then, I've relied on knowing the initial volume in the tank and our 5-6 gallons per day average use. That guestimation let me down once - then I learned about the Mopeka Pro Check Water Sensor. The sensor in my application is amazingly accurate. We've been using it since July. Installation was straight forward.


Parts involved were limited to 2 items: One 6" boat hatch and the Mopeka Pro Check Water Sensor and collar.

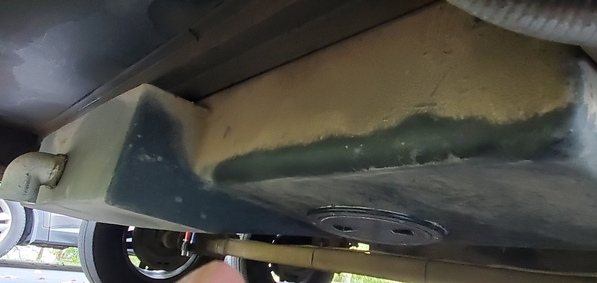
Tools were minimal. To cut the circle in the tank tub to mount the boat hatch in, one could use a utility knife but I used a zip tool in my Dremel tool. Just be careful to go only as deep as the tub is thick. I chose a place near the dip tube from the pump above.  Push upward to asses the flexation of the tub to be sure nothing is between the tank and tub. Clean up the circle with the knife. I cut shallow enough that I had to cut the insulation with the knife only enough to fold it to the side. Follow the Mopeka instruction and install the sensor trying to choose a place that is as close to perpendicular to the top of the tank as possible, you won't know until the hole is open.

Finish up by installing the boat hatch. Make sure the screws are only long enough to just clear the tub thickness. I ground off the points on the sheet metal screws to be sure they couldn't puncture the fresh tank.

Follow the instructions to calibrate the sensor. The sensor location in my install wasn't near perpendicular to the tank top. A step in the installation was to use the bubble level in the app to come as close to perpendicular as possible then lock it in. What I did was install the sensor where I cut the hole thru the tub then cheat the bubble level tilting the phone/app to get as close as I could get it to center then pressed the calibrate lock button.

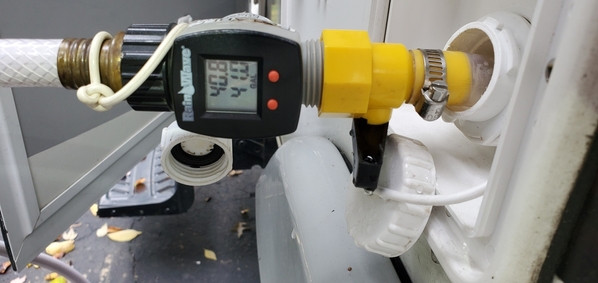
The next step after the bubble level is to enter the depth of the tank. I didn't worry about that because the reading will only accurately reflect the gallonage if the volume is known. I used the hose end meter I always used. I filled the empty tank with 11.25 gallons of water. 11.25 gallons equates to 25% of the 45 gallon tank. I varied the tank depth inches until the Mopeka Pro read 25%. I proceeded to 15 gallons representing the old light set of 1/3 of a tank and the Mopeka Pro read 33%. I was very happy to see this level of accuracy. It's been that way so far each time I've filled the tank to various levels.

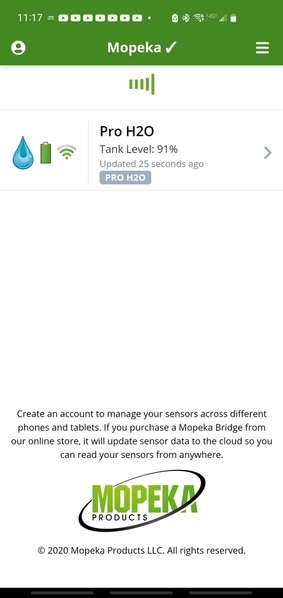
The pictures below were from the most recent tank fill last week. Near the end of this trip I saw 11 gallons remaining. The next day when my average of 5-6 gallons per day had me think there was 5 or less gallons remaining, the Mopeka Pro read "LOW" with low sensitivity. The lowest reading from the Mopeka Pro I've seen told me I had 7 gallons remaining. I'm happy with that!

20231007_111756Screenshot_20231007-111714_Tank Screenshot_20231007-111708_Calculator

Attachments

Images (3)
  • 20231007_111756
  • Screenshot_20231007-111714_Tank
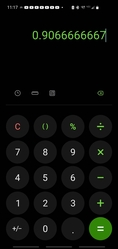
  • Screenshot_20231007-111708_Calculator: 91% of a 45 gallon tank!
Last edited by Eric Dye
Original Post

Replies sorted oldest to newest

Interesting, guess I am lucky, factory tank indicators are pretty accurate.  However, I clean black tank for 10 minutes using built in tank flush and finish using gate valve flush as well.  Gray gets aggressively cleaned 6 times a year.   I switched to this tank treatment years ago, this is the best! Double dose on cleaning day let it sit for several hours, clean as a whistle.

https://amzn.to/4aNlTKT


Screenshot_20231017_140715_Chrome

Attachments

Images (1)
  • Screenshot_20231017_140715_Chrome
Last edited by Eric Dye

@shadow, I should have mentioned, or you'd find out reading the manufacturer's info, this isn't for black tank use. Mopeka recommends this sensor for fresh or grey water only. Too many solids absorb too much of the signal so the accuracy can't be confirmed.

As far as accurate, I'd prefer to know more than "you might be on your last 15 gallons of fresh water". Those light divisions of 1/3 are nearly worthless for fresh water boondocking inventory. Gray is intuitively linked to fresh water usage and black is easy to see how much room is left - just look down the hole!

Nice write up Dave.

I've considered both the Mopeka sensor for FW and also the Garnet, Sealevel sensor system that provides info on all the tanks  So, far, I haven't pulled the trigger.

Our FW stock monitor is fairly accurate, but as you mentioned, only down to the 1/3 level.  Our GW tank gives us a warning when the shower drain starts makes noise or starts spilling out into the shower.

Our BW tank gives me the most concern.  I can't look down the hole to see the water level, as there is a bend in the plumbing. 

If, and/or when, you buy that shinny new 855s TC, you will be stopping to dump much more often than in your TT. 

Last edited by Les1
@Les1 posted:

Nice write up Dave.

I've considered both the Mopeka sensor for FW and also the Garnet, Sealevel sensor system that provides info on all the tanks  So, far, I haven't pulled the trigger.

Our FW stock monitor is fairly accurate, but as you mentioned, only down to the 1/3 level.  Our GW tank gives us a warning when the shower drain starts makes noise or starts spilling out into the shower.

Our BW tank gives me the most concern.  I can't look down the hole to see the water level, as there is a bend in the plumbing.

If, and/or when, you buy that shinny new 855s TC, you will be stopping to dump much more often than in your TT. 

Indeed ... the dark chalange! 😅

@VigII posted:

Tools were minimal. To cut the circle in the tank tub to mount the boat hatch in, one could use a utility knife but I used a zip tool in my Dremel tool. Just be careful to go only as deep as the tub is thick. I chose a place near the dip tube from the pump above.  Push upward to asses the flexation of the tub to be sure nothing is between the tank and tub. Clean up the circle with the knife. I cut shallow enough that I had to cut the insulation with the knife only enough to fold it to the side. Follow the Mopeka instruction and install the sensor trying to choose a place that is as close to perpendicular to the top of the tank as possible, you won't know until the hole is open.

Finish up by installing the boat hatch. Make sure the screws are only long enough to just clear the tub thickness. I ground off the points on the sheet metal screws to be sure they couldn't puncture the fresh tank.

Dave, how about a photo or two for a better idea of the hatch portion of your install.

Last edited by Brubie
@Brubie posted:

Dave, how about a photo or two for a better idea of the hatch portion of your install.

Here they are ...

Fresh water tank enclosure with desert patina ...

20231019_152948

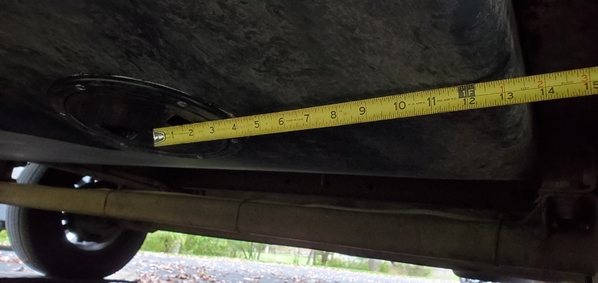
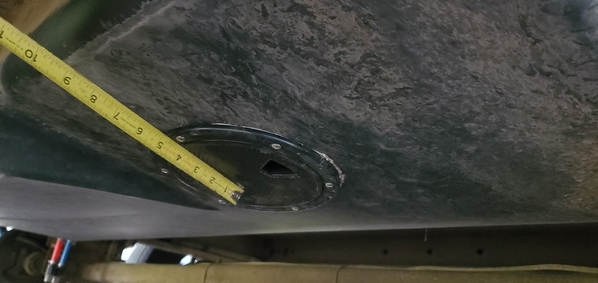
I located the port about 13+" in from curbside ...

20231019_152738

... and about 9" back from the rear.

20231019_152750

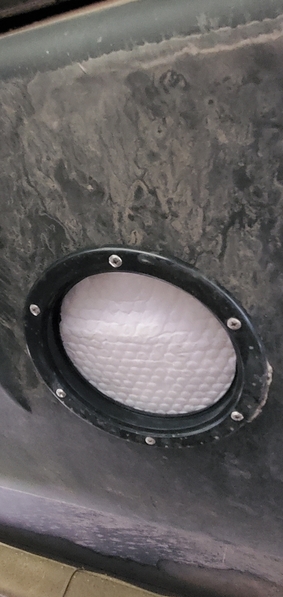
The opened port.

20231019_152853

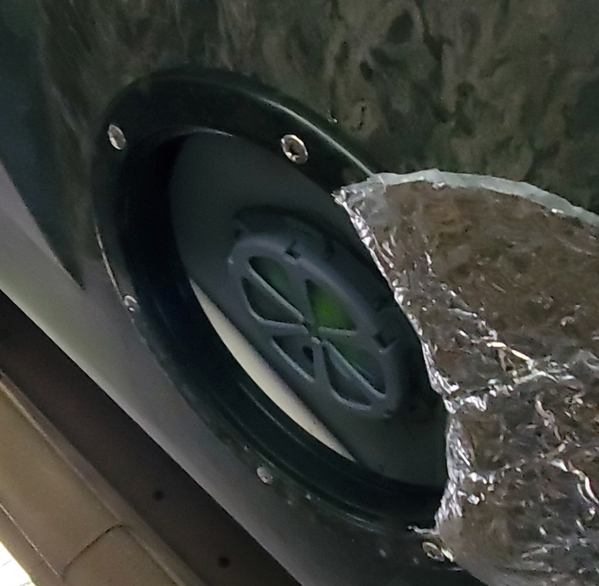
Insulation pulled back to see the sensor and lurking PVC pipe.

SmartSelect_20231019_221405_Gallery

Attachments

Images (5)
  • 20231019_152948
  • 20231019_152738
  • 20231019_152750
  • 20231019_152853
  • SmartSelect_20231019_221405_Gallery
Last edited by VigII

Thanks for posting those images, Dave, it makes your installation much clearer. Couple questions:

1) When installing the hatch, did you use the plastic epoxy suggested in the video?

2) Were you just lucky missing the "lurking PVC pipe" or could that be a problem when choosing the hatch location?

@Brubie posted:

Thanks for posting those images, Dave, it makes your installation much clearer. Couple questions:

1) When installing the hatch, did you use the plastic epoxy suggested in the video?

2) Were you just lucky missing the "lurking PVC pipe" or could that be a problem when choosing the hatch location?

1) I used butyl tape and shortened SS screws. Love the butyl stuff because  it's sticky as all get-out and never dries. One can remove the piece with some determination where with epoxy it's going to stay there.

2) That was actually a little of both! I pushed up on the tub to find a soft flex area big enough for the port. After I drew the porthole in white pencil, I pressed around the drawn hole's perimeter to be sure there was flex. A few inches toward where I discovered the lurking pipe, there was no flex. I felt good about plunging forward and no ill effects occurred. Was it luck or planning?

Last edited by VigII
@VigII posted:


The next step after the bubble level is to enter the depth of the tank. I didn't worry about that because the reading will only accurately reflect the gallonage if the volume is known. I used the hose end meter I always used. I filled the empty tank with 11.25 gallons of water. 11.25 gallons equates to 25% of the 45 gallon tank. I varied the tank depth inches until the Mopeka Pro read 25%. I proceeded to 15 gallons representing the old light set of 1/3 of a tank and the Mopeka Pro read 33%. I was very happy to see this level of accuracy. It's been that way so far each time I've filled the tank to various levels.

I like this idea. Nicely done.  This is probably now on my list.

One more thing you may want to try out in the calibrating step... I noticed, when I was calibrating my "sight-glass" mod, is that my tank had several unusable gallons at the bottom.  Three I think.  I don't know if that is a normal condition or not.  I figured that out, when after draining the tank completely and de-priming the water pump, the pump would not re-prime until there were 3 gallons in the tank.  I did not test the other direction ... in other words, if the pump was still primed, would it pick up the last three gallons?  In your set up, it might be an easy thing to test ... when Mopika says there are only 5 gallons left, turn on the pump and see if how many it says are left when the water stops flowing.  Just a though.

Side note:  The "sight-glass" still works and is way better than the indicator light for that bottom 1/3rd.  But, it isn't very good when you get down to the last 5ish gallons... and it is kind of a PITA to keep clean.  I think I may give Mopika a try.

@_Steve posted:

I like this idea. Nicely done.  This is probably now on my list.

One more thing you may want to try out in the calibrating step... I noticed, when I was calibrating my "sight-glass" mod, is that my tank had several unusable gallons at the bottom.  Three I think.  I don't know if that is a normal condition or not.  I figured that out, when after draining the tank completely and de-priming the water pump, the pump would not re-prime until there were 3 gallons in the tank.  I did not test the other direction ... in other words, if the pump was still primed, would it pick up the last three gallons?  In your set up, it might be an easy thing to test ... when Mopika says there are only 5 gallons left, turn on the pump and see if how many it says are left when the water stops flowing.  Just a though.

Side note:  The "sight-glass" still works and is way better than the indicator light for that bottom 1/3rd.  But, it isn't very good when you get down to the last 5ish gallons... and it is kind of a PITA to keep clean.  I think I may give Mopika a try.

I was very tempted to do your sight glass mod. I never moved on it because I had a pretty good 'windage' guesstimate by knowing how many gallons I started out with. Then I saw the Mopeka water tank gizmo!

The gauge doesn't seem to be able to gauge the last ~5 gallons in the tank. It re with poor quality signal.  Perhaps that is because I have it mounted on what appeared to me to be a slope in the tank near the water pickup. Maybe that's where the hidden 3 gallons you describe is, in that little well.

I'm not certain there is a well/low spot there. The slope makes me think there is at least in my tanks installation. In all the assembly line pictures I've seen it looks like the tanks are uniform. Perhaps that PVC pipe running towards the drain pushes up on the bottom of the tank physically slightly deforming it and forming the well as a result.

Last edited by VigII
@VigII posted:


I'm not certain there is a well/low spot there. The slope makes me think there is at least in my tanks installation. In all the assembly line pictures I've seen it looks like the tanks are uniform. Perhaps that PVC pipe running towards the drain pushes up on the bottom of the tank physically slightly deforming it and forming the well as a result.

Having now done the job and knowing what you know now, if you had a "do-over" would you locate in the same place?  Or would say "move it over this or that way a few inches."?

The picture looks as though the 6 inch port was an appropriate size choice.  In the "do-over", would you pick that same size again?

Cheers

@_Steve posted:

Having now done the job and knowing what you know now, if you had a "do-over" would you locate in the same place?  Or would say "move it over this or that way a few inches."?

The picture looks as though the 6 inch port was an appropriate size choice.  In the "do-over", would you pick that same size again?

Cheers

Port size is fine at 6" diameter.  As for placing the hole for the port I'd stay the same distance from the back of the tub and move the centerline an inch to the curb side. Remember these are crew built units so use my placement with your own assessments. You should find the proper tub flex to locate the right spot but at least you have a general area with what I measured - YMMV!

I've since added a sensor on my freshwater tank per @VigII installation posted here. Easy to install. I was a little worried about the six inch port hatch vibrating loose (as things do when traveling) so added a small strip of duct tape just to make sure the screw-on hatch top doesn't end up along the roadside. So nice now to have a more accurate freshwater monitor! Thanks, Dave, for your good writeup.

Last edited by Brubie
@Brubie posted:

I've since added a sensor on my freshwater tank per @VigII installation posted here. Easy to install. I was a little worried about the six inch port hatch vibrating loose (as things do when traveling) so added a small strip of duct tape just to make sure the screw-on hatch top doesn't end up along the roadside. So nice now to have a more accurate freshwater monitor! Thanks, Dave, for your good writeup.

@Brubie, I just received my sensor and hatch today.  Since we both have 2018 model year 1995's, I'm wondering what you can share about the location you chose for the hatch, anything else you may have learned and, of course, any photos you may be able to share.

-Thanks

@PeterPam posted:

@Brubie, I just received my sensor and hatch today.  Since we both have 2018 model year 1995's, I'm wondering what you can share about the location you chose for the hatch, anything else you may have learned and, of course, any photos you may be able to share.

-Thanks

I followed Dave's installation instructions, including his precise measurements which I found to be the same for my trailer. I've had no issues with the unit since installing it and it continues to work well. I may add another sensor to my gray tank next summer.

@VigII posted:

Here they are ...

Fresh water tank enclosure with desert patina ...

20231019_152948

I located the port about 13+" in from curbside ...

20231019_152738

... and about 9" back from the rear.

20231019_152750

The opened port.

20231019_152853

Insulation pulled back to see the sensor and lurking PVC pipe.

SmartSelect_20231019_221405_Gallery

Hi Dave,

I received my Mopeka sensor and the 6" boat hatch.  I'm ready to start the installation but wanted to verify the location you used. You said you installed it "13" from curbside" and "9" back from the rear."  The photo you posted seems to show the hatch on the street side of the tank drain elbow rather than on the curbside.  On my 1995 the tank drain points to the front of the trailer.  When you say "9" back from the rear do you mean 9" from the back of the tank towards the front of the trailer? Would moving it a little more towards the front of the trailer provide a little more clearance from the "lurking PVC pipe"?

@PeterPam posted:

Hi Dave,

I received my Mopeka sensor and the 6" boat hatch.  I'm ready to start the installation but wanted to verify the location you used. You said you installed it "13" from curbside" and "9" back from the rear."  The photo you posted seems to show the hatch on the street side of the tank drain elbow rather than on the curbside.  On my 1995 the tank drain points to the front of the trailer.  When you say "9" back from the rear do you mean 9" from the back of the tank towards the front of the trailer? Would moving it a little more towards the front of the trailer provide a little more clearance from the "lurking PVC pipe"?

The pictures and installation are of my 2019 2285 and orientation is as stated. I positioned it as close to the water pump dip tube as practical. The  FW tank is behind the rear axle. The pump is located curb side by the wheel well and the drain faces rearward.

I don't know your tt as well as you do. Do the same reasoning process backed up with the push probing of the tub over the fresh tank and proceed cautiously.

"When you say "9" back from the rear do you mean 9" from the back of the tank towards the front of the trailer?" Yes, I could have been clearer but my PA Dutch dialect (really PA Deutch, they didn't state that correctly either!) is showing itself!

Thanks for the clarification, Dave this is helpful. Our trailers are opposite. In the 1995 the fresh water tank is in front of the axles and the tank drain faces forward. I’ve got a good idea now how to proceed. Thanks for bringing this product to our attention and for sharing your installation.

I have now installed and calibrated my Mopeka Pro Check sensor on the fresh water tank on my 1995. The guidance from @Vigil and @Brubie made the job uneventful.  Even though the 1995 apparently has a different tank arrangement from @Vigil's 2285, the same location worked out well.  I installed it 12" from the curbside of the tank and 9" forward from the back of the tank.  I did not find the 'lurking pipe' that @Vigil did but was able to feel what seemed to be some tubing running across the trailer between the water tank and the shroud about 4" towards the front of the trailer from the edge of the hole I cut for the 6" boat hatch.  Everything worked out just as described in @Vigil's original post.  I calibrated the sensor just as @Vigil describes.  I won't be on a trip to road test it until we go to RITV in January but, in the driveway, I'm very impressed with the accuracy.

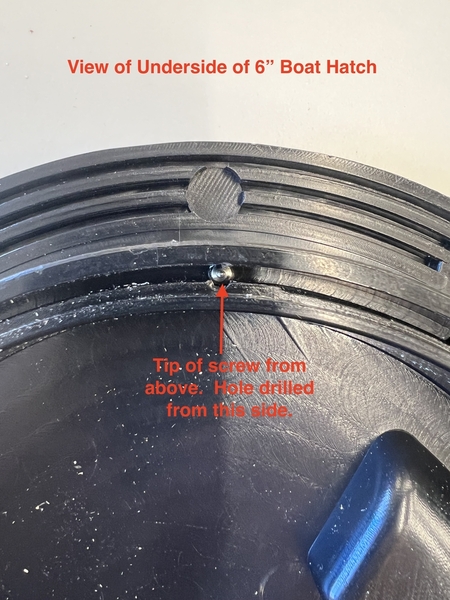
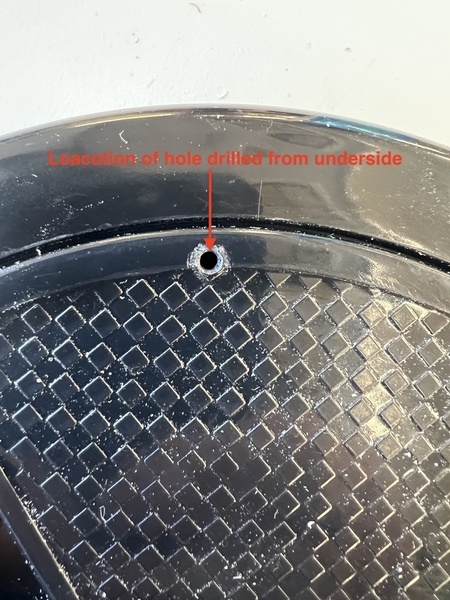
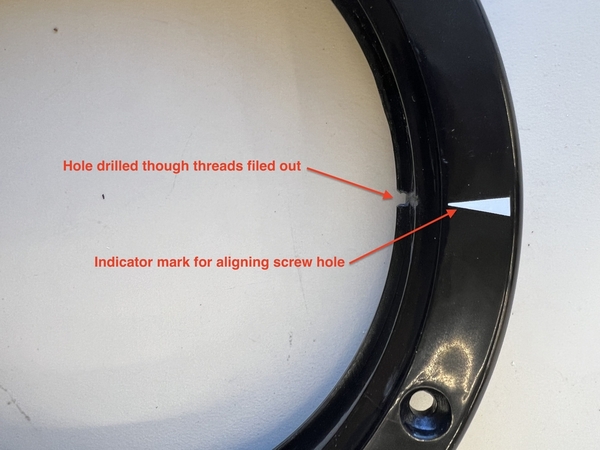
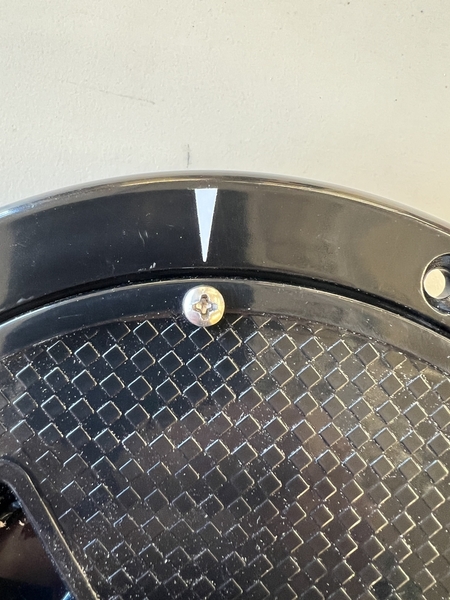
@Brubie got me thinking with his comment about the 6" boat hatch cover possibly vibrating loose during travel.  Deciding it really didn't matter for this application, I removed the o-ring from the hatch cover and drilled a hole from the bottom side of the hatch through the threads and installed a #6 x 3/4" stainless steel screw into the threads to lock the cover in place.  The screw does not protrude beyond the flange of the hatch.  One only needs to remove the screw before unscrewing the cover.  I filed out the hole drilled through the threads to make it easier to remove and reinstall the cover and added an indicator mark to make it easier to locate the screw hole when replacing the cover.  

IMG_2224IMG_2227IMG_2229IMG_2228

Attachments

Images (4)
  • IMG_2224
  • IMG_2227
  • IMG_2229
  • IMG_2228
@Brubie posted:

I followed Dave's installation instructions, including his precise measurements which I found to be the same for my trailer. I've had no issues with the unit since installing it and it continues to work well. I may add another sensor to my gray tank next summer.

Hi @Brubie - I've decided to go ahead and add a Mopeka sensor to my Gray water tank before we leave for a long trip in June.  Since we have the same model and year trailer I was wondering whether or not you had gone ahead and added one to yours.  

In case you didn't see it, this is a link to a post I made recently regarding changes to the Mopeka sensor product line.

https://community.lanceowners....-water-sensor-update

Hey guys reading this entire thread has me fired up. But… I am in a TC. As we all know the TC is only supported by the perimeter frame. I have already dropped the belly pan and reattached the silly water sensors that don’t work half the time. What is the total thickness of the sensor and hatch cover? This will determine if I can find a suitable spot between framing members. And are all you guys happy with it after a year of use?

Bob/Texas

I’m happy with mine. I never measured the depth of the sensor with its bracket but it really doesn’t matter because it sits within the perimeter of the boat hatch cover. I would guess it’s a total of about 1/2”. The hatch cover has a ring that extends into the space between the bottom of the belly pan and the holding tank. As I recall the total depth of the boat hatch was about 1”. On my 1995 the thickness of the belly pan is 3/16” and the mounting flange is maybe another 3/16” so the ring on the hatch extends about 5/8” into the space above the belly pan (1” - 3/16” - 3/16”).

@jarheade6 posted:

Hey guys reading this entire thread has me fired up. But… I am in a TC. As we all know the TC is only supported by the perimeter frame. I have already dropped the belly pan and reattached the silly water sensors that don’t work half the time. What is the total thickness of the sensor and hatch cover? This will determine if I can find a suitable spot between framing members. And are all you guys happy with it after a year of use?

Bob/Texas

I dropped the belly and installed Sea level gauges.  Just stick them on the sides of the tanks and run a wire to where you want the panel located.  There is no maintenance required (battery replacement, etc.).  They have worked great for 12 years and still are accurate.

I struggled a bit installing on my 1985 because of the sensor thickness. The location that I chose to install turned out to be pretty tight between the tank and pan. I ended up 3D printing a 1/4 inch spacer for the boat hatch. The tank must have an irregular shape because there is no “calibration” (for me) that provides an accurate measurement from empty to full. I have it calibrated to be accurate for the bottom 1/3rd. As such, when the tank is full, Mopika reads about 80%. Perhaps a different installation location would read differently, but it is where it is, not cutting a new hole to move it.

@_Steve posted:

I struggled a bit installing on my 1985 because of the sensor thickness. The location that I chose to install turned out to be pretty tight between the tank and pan. I ended up 3D printing a 1/4 inch spacer for the boat hatch. The tank must have an irregular shape because there is no “calibration” (for me) that provides an accurate measurement from empty to full. I have it calibrated to be accurate for the bottom 1/3rd. As such, when the tank is full, Mopika reads about 80%. Perhaps a different installation location would read differently, but it is where it is, not cutting a new hole to move it.

Have you tried backing into the tank height setting? You can do this by putting in a measured amount of water with a hose end meter like this one,

https://www.amazon.com/gp/prod...le?ie=UTF8&psc=1

Then adjust the tank height to suit.  I found it was best to do it at, say, 1/3 full (15 gallons), 1/2 full (22.5 gallons), 2/3 full, and full (45 gallons). If you adjust it at each increment you can zero in on a setting that will be very close.  I discovered that you can input fractions of an inch like 7.6" even though the display will round it off to full inches.

@_Steve posted:

I struggled a bit installing on my 1985 because of the sensor thickness. The location that I chose to install turned out to be pretty tight between the tank and pan. I ended up 3D printing a 1/4 inch spacer for the boat hatch. The tank must have an irregular shape because there is no “calibration” (for me) that provides an accurate measurement from empty to full. I have it calibrated to be accurate for the bottom 1/3rd. As such, when the tank is full, Mopika reads about 80%. Perhaps a different installation location would read differently, but it is where it is, not cutting a new hole to move it.

Always check the amount of deflection the exterior tub at your chosen installation spot.  I'm glad that you got it to work.

I put a known volume in the tank. Then i played with the level and tank depth numbers until the percentage of the tank volume (45 gallons in my case) matched my metered volume.

@VigII posted:

Always check the amount of deflection the exterior tub at your chosen installation spot.  I'm glad that you got it to work.

I put a known volume in the tank. Then i played with the level and tank depth numbers until the percentage of the tank volume (45 gallons in my case) matched my metered volume.

Yeah I did a lot of pressing on the tub… and even drilled several small inspection holes. Apparently I did not correctly interrupt the data.

I “calibrated” pretty much as you describe…. Measured volume, set the appropriate calibration depth value, add another known volume, wash rinse repeat until full. I could not establish a single depth value that was accurate for all volumes. Sooo at least for now, it is reasonably accurate for the bottom 1/3.

@PeterPam posted:

Have you tried backing into the tank height setting? You can do this by putting in a measured amount of water with a hose end meter like this one,

https://www.amazon.com/gp/prod...le?ie=UTF8&psc=1

Then adjust the tank height to suit.  I found it was best to do it at, say, 1/3 full (15 gallons), 1/2 full (22.5 gallons), 2/3 full, and full (45 gallons). If you adjust it at each increment you can zero in on a setting that will be very close.  I discovered that you can input fractions of an inch like 7.6" even though the display will round it off to full inches.

Yes I did use a flow meter. … could not zone in on a value that was acceptable for both the bottom 1/3 and top 1/3. Maybe I need to try again. I didn’t know about the fractions.

@_Steve posted:

Yeah I did a lot of pressing on the tub… and even drilled several small inspection holes. Apparently I did not correctly interrupt the data.

I “calibrated” pretty much as you describe…. Measured volume, set the appropriate calibration depth value, add another known volume, wash rinse repeat until full. I could not establish a single depth value that was accurate for all volumes. Sooo at least for now, it is reasonably accurate for the bottom 1/3.

Did you find the bubble level setting in the app? I fooled it to interpret that the sensor was a close to level as I could.  That setting is what I attribute the accuracy at higher levels. I don't know the sensor's ultrasound cone angle is but setting a "level" baseline made a difference in my installation since my sensor is mounted on a sloped pat of the tank.

Last edited by VigII

Add Reply

Post
Lance Owners of America - All Rights Reserved 2000 - 2024
×
×
×
×
Link copied to your clipboard.
×